Proper Installation of Insulated Metal Wall Panels
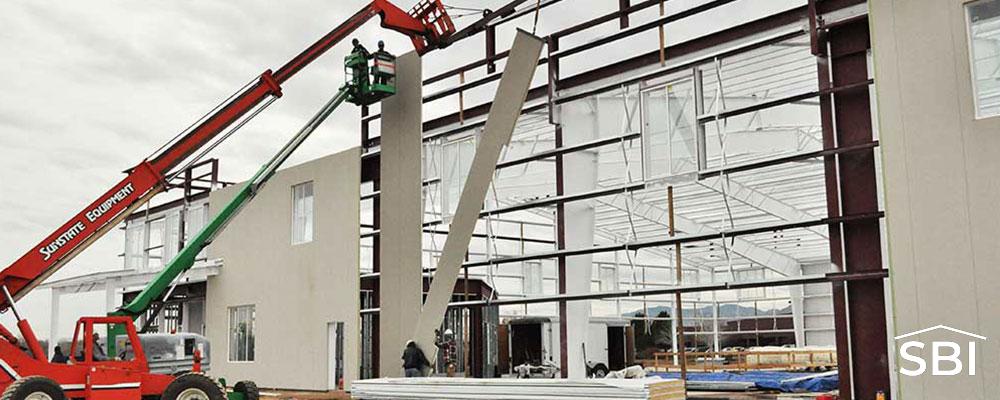
Insulated metal panels (IMPs) are an ideal cladding solution for pre-engineered metal buildings. They are available in lengths up to 50’, and may also incorporate stack joint conditions for taller buildings. Panel thicknesses are from 2” through 6”, with excellent R values of approximately 7.5 per inch.
The key considerations when using IMPs with pre-engineered metal buildings are as follows:
Structural alignment – IMPs are fairly flexible, but not as flexible as single skin cladding. Typical structural alignment for vertically installed panels requires that wall girts be ± 1/8” in 5 feet in any direction along plane of framing, ± 3/8” in 20 feet cumulative in any direction along framing plane and ± ¾” from the framing plane on any elevation. In addition, panel supports must extend to the outer extremities at all panel terminations.
Failure to properly align structural components to these tolerances can result in numerous issues including:
Difficulty in Engaging Panels
Upon attachment, panels will follow the contour of the girt system. As the next panel is hoisted into place, engagement can become difficult or nearly impossible as the original panel is now shaped by structural misalignment. This typically leads to the installer resorting to unapproved methods of forcing subsequent panels to conform to the misalignment, such as…
- Banging on panels with mallets, hammers, wood blocking etc.
- Using “come alongs” to force engagement
- Using excessive torque on clip fasteners trying to force panel to contact supporting structural members.
Each of these improper techniques can result in long term panel damage, including delamination, thermal blistering and panel kinks. Properly aligned secondary assures that panels will engage easily and without undue force, and will result in the best possible aesthetic for the panel (flat and with a minimum of visible distortion).
There are several different details available for base conditions:
Base details: When designing panel alignment vs. slab edge, it is good to remember a basic principle of insulated panels. In commercial/industrial applications, the exterior panel joint serves as a wall drainage channel. In other words, it carries water via gravity down the panel system and out at the bottom of the wall.
Bypass Condition: Outside flange of wall girts are aligned with outside edge of slab. This allows the panels to be outboard of the slab at the base, and provides the most effective way to drain wall system water out and away.
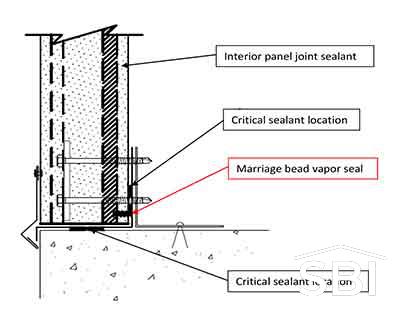
Notched Slab: is where the concrete slab is constructed with a “key way”. This requires the use of back-flashing to drain water from the exterior joint out and away from the wall.
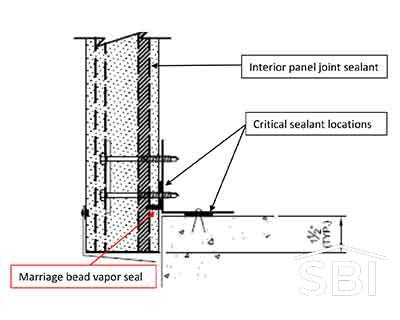
Flush Condition: is where the wall girts are inset the thickness of the panels, so that the outside face of the panels is flush with the slab edge.
Bypass Condition
Flush Condition
Notched Slab
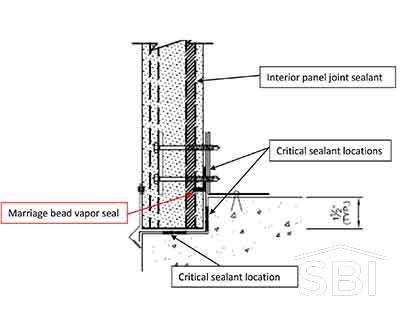
All base details are sensitive to the proper placement of butyl sealant. In particular, non-skinning butyl sealant must be placed at the following areas:
- Between the vertical back leg of the Z flashing or base support and the interior face of the panel (all base details)
- Between the horizontal slab surface and the underside of the Z flashing to prevent wind driven rain from entering the building (notched slab and flush condition details)
- Between the base angle/support and concrete slab (overhang detail)
- Lap conditions for all Z flashings (2 rows of sealant recommended)
Finish Grade: Care must be taken to ensure that the base detail chosen is compatible with finish grade. The photo below shows an improper base condition, where the bottom of the panels are covered up by concrete.
This poses several problems:
- Drainage is blocked from the exterior panel joint, causing water to build up within the joint. This particular situation resulted in leaks to the interior of the building.
- The metal skins of the panel are not designed to be below grade. This will lead to premature corrosion of the panel skins and associated paint system failure.
Window Details
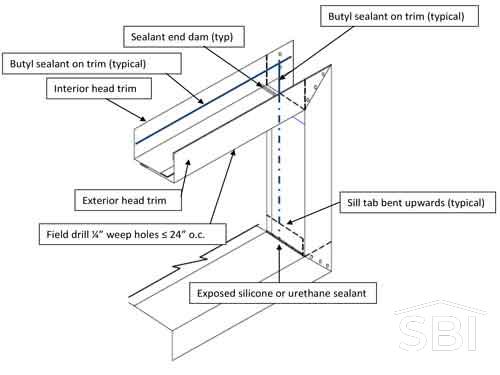
Proper trim installation is essential to prevent leaks at window areas. Typical trim details use two piece trims for head and jambs, and one piece trim for sill conditions.
It is critical that the interior portion of the two piece trims be installed prior to the installation of wall panels. Non-skinning butyl sealant must be placed between the vertical legs of the interior trims and the supporting structural C girts to prevent wind driven rain from entering the opening. In addition, sealant must be placed between the vertical leg of the interior trims and the backside of the panels to prevent both water intrusion.
Each end of the one piece sill trim should employ field bent tabs (bent upwards) before installing the outer jamb trims. Then, seal the juncture of the sill and jamb trims with exposed sealant (typically silicone or urethane).
Following these simple guidelines should help you enjoy the benefits of insulated metal wall panels for the life of your building.
